Wednesday, February 5, 2014
Wednesday, April 25, 2012
Improving a Ray Tracer
Here is a low-res look at a pretty ray-traced environment I'm working on.
It utilizes the nice lighting formulas from the still-frame ray-tracer I posted earlier. More importantly, at its core it's a revamped version of my old ray tracer world from high school and uses the same speedup techniques, and as such, it's suitable as a physics environment.
This scene just shows some static particles that are centered in their bounding cubes. Pause it at some key moments and notice the reflections and refractions through everything.
All particles have continuous motions and spatial placements, but I'm not going to demonstrate that here until I fix a bug in my display function.
During late high school when I was getting better at code, I wanted to make a physics sandbox world where you could make or break anything. Using the idea that physics and light just reduce to a bunch of vector math, I built a ray-tracer, not really knowing or caring about how more common polygon-based graphics work. I made it work in real time, which is a rare thing for ray tracing. It wasn't the prettiest thing at this point, but all that was missing to make it pretty was a little lighting math - the ray tracing part (even reflections, in a later version that I lost) worked.
You can see here what it was capable of:
To avoid the inevitably slow computations of "what touches what" every timestep, I decided to use a voxel subdivision (think 3D pixels) to trivialize the problems of noticing collisions and casting out light rays into things. But I also realized that a voxel grid alone wouldn't suffice for physics interactions - not accurarely anyway, when your discretization error is as big around as your objects' details and vectors of motion. So here, its evident that I made the voxels an invisible "behind the scenes" way to speed things up, with all objects being instead made out of particles that flow around and between these invisible grid cells.
To achieve elastic deformations, I applied Lennard-Jones like forces to stick particles together, and used the Forward Euler method for timestepping. I didn't know that either of these had real names, so of course I was confused when I hit the limits of that method's numerical stability - in this video you can see when I group particles together that my mesh is very stiff, and so not long after it deforms you can watch it go unstable.
Looking back on this code even now I have a hard time wrapping my head around how it all worked - it's the most impressive effort I've ever undertaken considering what little I had to work with (one high school physics course), and many months of thought were poured into its design. I'll continue adapting its functionality into my newer virtual world.
Thursday, January 5, 2012
Some tests using a physics engine!
I hooked up my 3D modeling toy to the publicly available "Bullet" Physics Engine. Sure enough, it does physics! I also recently overhauled the way my 3D tool itself works, adding flexibilty and speed. Here are some clips I made while testing it.
Next up: Adding some soft, deformable blobs from the Bullet engine (instead of hard spheres). The blobs will stick to the structures you make and will, using AI, crawl around on them in a lifelike manner in search of their destinations. The variety of possible structures should provide plenty of challenging scenarios for them! This will be an exploration of basic locomotion for artificial creatures.
Next up: Adding some soft, deformable blobs from the Bullet engine (instead of hard spheres). The blobs will stick to the structures you make and will, using AI, crawl around on them in a lifelike manner in search of their destinations. The variety of possible structures should provide plenty of challenging scenarios for them! This will be an exploration of basic locomotion for artificial creatures.
Thursday, October 20, 2011
Some examples from the sculpting tool
I've already posted a video of how my 3D modeling tool quickly builds shapes, but haven't shown many examples of end results. I'm still in the process of redesigning how the tool works, but these were made around the same time as that post.
In just a few keystrokes, by repeating the same box-shaped objects and their transforms relative to the previous box, you can get all sorts of shapes. Users in a virtual environment could shape their surroundings very rapidly with this tool.
(Click for larger)
In just a few keystrokes, by repeating the same box-shaped objects and their transforms relative to the previous box, you can get all sorts of shapes. Users in a virtual environment could shape their surroundings very rapidly with this tool.
(Click for larger)
 |  |
 |  |
 |  |
 |  |
 |  |
 |  |
 |
Tuesday, October 18, 2011
Using "snakes" to visually find object boundaries
Looking at an image and figuring out where the boundaries are of each object is a hard problem. Here I have implemented a technique that can find object boundaries within either images or videos.
The idea, described in this paper1, begins by physically modeling a flexible metal wire (like a guitar string) and placing that wire overtop of the image. The program then generates "pushes" onto the wire based on what sort of image features are near it (such as bright areas or sudden brightness changes). Those pushes gradually stretch the wire into different positions. In the end, the stretched wire sits somewhere that serves as a reasonable boundary between two objects.
Computer vision scientists call this technique "snakes" or "active countours". The paper also used a math trick called dynamic programming to model the wire's energy - this trick finds the best possible rearrangement of the wire at each moment, and applying it takes relatively few computation steps.
This sort of thing is useful if you want to, say, select and cut out an entire object that moves around in a video.
The Demo:
(Special thanks goes to my friend Chenfanfu for recording these videos)
Here my program tries to find edges on a difficult image of the sun's corona. It works in an adaptive way while the user drags their mouse. You can see that it can usually compensate even when the user is very sloppy when pointing at their desired boundary:
Here you can look at my code. You can also try running it if you install OpenCV 2.2 on your computer first.
I believe that makes this the world's first complete open-source implementation of Dynamic Programming Snakes to hit the internet (others that I found online either had bugs or lacked the difficult "thin plate" term in the energy equation).
Here is my team's detailed report, which additionally includes my teammates' alternative implementation that instead uses a Greedy method to compute the snake's next move. Their videos are here.
1 "Using Dynamic Programming for Minimizing the Energy of Active Contours in the Presence of Hard Constraints", A. Amini, S. Tehrani, and T. Weymouth
The idea, described in this paper1, begins by physically modeling a flexible metal wire (like a guitar string) and placing that wire overtop of the image. The program then generates "pushes" onto the wire based on what sort of image features are near it (such as bright areas or sudden brightness changes). Those pushes gradually stretch the wire into different positions. In the end, the stretched wire sits somewhere that serves as a reasonable boundary between two objects.
Computer vision scientists call this technique "snakes" or "active countours". The paper also used a math trick called dynamic programming to model the wire's energy - this trick finds the best possible rearrangement of the wire at each moment, and applying it takes relatively few computation steps.
This sort of thing is useful if you want to, say, select and cut out an entire object that moves around in a video.
The Demo:
(Special thanks goes to my friend Chenfanfu for recording these videos)
Here my program tries to find edges on a difficult image of the sun's corona. It works in an adaptive way while the user drags their mouse. You can see that it can usually compensate even when the user is very sloppy when pointing at their desired boundary:
Here it finds the boundary of an object in a video. The elastic "snake" continues to stretch to fit the boundary it found even as the object moves and deforms:
Here you can look at my code. You can also try running it if you install OpenCV 2.2 on your computer first.
I believe that makes this the world's first complete open-source implementation of Dynamic Programming Snakes to hit the internet (others that I found online either had bugs or lacked the difficult "thin plate" term in the energy equation).
Here is my team's detailed report, which additionally includes my teammates' alternative implementation that instead uses a Greedy method to compute the snake's next move. Their videos are here.
1 "Using Dynamic Programming for Minimizing the Energy of Active Contours in the Presence of Hard Constraints", A. Amini, S. Tehrani, and T. Weymouth
Monday, March 21, 2011
Building a Ray Tracer

The final project for "Introduction to Graphics" was to make a ray tracer, a program that renders a 3D scene by tracing the path of rays of light as they strike objects, reflect off of them, and cast shadows.
The image you see above was not drawn using OpenGL or any graphics utilities; its colors were rendered from scratch, pixel by pixel, by mathematically tracing rays.
For the assignment, our programs were not allowed to know ahead of time what the scene would include. Instead, an input text file would tell it about factors such as how the virtual camera lens is shaped, where the lights are and how they're colored, where the spheres are and how they're stretched, how reflective they are, and how chalky and how shiny their materials are. Based on only that input text file, the program outputs the correct image data into a picture file.
As it happens, this is not the first ray tracer I've made (or else this project would have been as difficult as we were warned it would be); I also made one during high school, while attempting to make my own lifelike physics engine. Having not yet learned about more common ways to display 3D graphics, I made my own ray tracer to render it (and also discovered a few other well-known graphics concepts by accident). Soon I will dig up that engine and make a post about it on here, because it used a neat voxel subdivision approach that I'll be revisiting in the future.
As for this tracer, it was created in a two day timespan and used 350 lines of C++ code, almost all of which were related to file input/output or lighting calculations.


Above: Some pictures from early development (click for bigger). The colors indicate things like a point's normal direction, its reflection direction, or one of the assorted vector dot products that were needed.


Above: Some pictures used for testing (click for bigger).
Here is a more aesthetically pleasing scene I put together, shown with different levels of reflectiveness for the spheres:


Here are two animations using the previous set of images:
Animation 1 (Smooth)
Animation 2 (Slow sequence)
Sunday, March 20, 2011
Animation Project: Fast 3D Sculpter


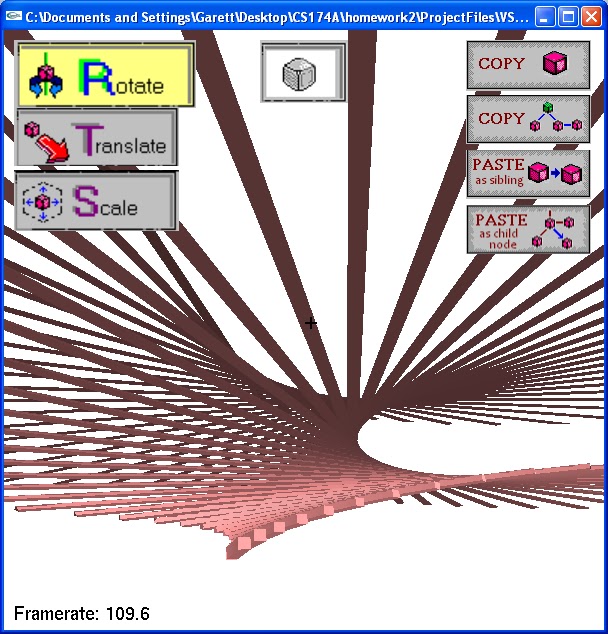
Here's a simple tool I've made for whipping up complex 3D structures quickly. Right now it's best at making things like fractals and spirals, but you can make anything with it (houses, cars, animals, etc.) with relatively few commands.
The video below mainly just shows how it works; fast forward to the end to watch it produce some complicated formations. Later on I'll record myself building a more visually realistic scene.
The user interface I made for this sculpter is extremely simple and has just a few buttons, with the clever "copy/paste" buttons doing most of the work. These let you duplicate entire branches of the scene graph of all your objects, allowing you to exploit symmetries and patterns in the objects you're trying to make so that they're done in fewer clicks.
Speed, not visual accuracy, is the goal. The idea is to quickly crank out prototypes with this, and then to use some more precise modeling tools later that will use the prototype's shape as a guideline.
The video:
Something like this will eventually be integrated into my long-term virtual environment project as the main way to construct things. Specifically, when you're done whipping up shapes with this tool, your finished structure will be used as a bounding volume to be filled with particles of physical materials (such as cloth, fluids, sand, metal, etc.); the structure will then exist in the environment as if it were made of those materials, by using soft body dynamics and other techniques.
This was made in 2 weeks for "Introduction to Graphics" class and is my first OpenGL creation. The class assignment was to animate something to show that we had learned how to do basic 3D stuff. I decided to make more of a construction sandbox than an animation; this "animation" won first place out of 49 others in a class vote, where its eligibility was borderline since I kind of went wild and did my own thing, but the results show the class at least seemed to approve. This sculpting tool was all done using C++ code; single matrix transforms (see examples) are used to simultaneously set the location, orientation, and shape of each object, with some more math thrown in when needed to make things bounce around.


Above: Some shapes that were defined recursively, by doing copy/pastes within the scene graph.


Above: Only one side of the house and ground needed to be drawn by hand. The other three sides were automatically generated by simply hitting the paste button three times, after having copied that part of the scene graph in a way that also included a rotation transform. Also shown is a tree, drawn by recursively replicating its own parts in a similar manner. The second drawing shows the whole first drawing replicated with a transform, which causes the scene to mutate in interesting ways.
Saturday, March 12, 2011
A few bits and pieces from last quarter
Here is an animation of the physics system project from MS270 (Scientific Computing). There are some strings / hairs and they fall.
 The blue string is unstable and wobbles everywhere because it uses explicit Euler integration to do the physics, which lets inaccuracies accumulate over time; if I had tried to stiffen the string any more those inaccuracies would increase off to infinity. The red and green strings however use the complicated implicit Euler method, and so they will behave fine at any stiffness. (To do that, I had to build a big matrix full of physics equations and then solve it with a matrix solver.)
Here's another one with both ends of a string held:
 Here's part of a fluid dynamics system. It shows the velocity of moving air over time at each location. Normally wind slows down and dissipates as it leaves the high-pressure region, but if pressure is forcibly held constant, the wind accelerates.

No air particles are simulated; instead, math is used to deduce the speed of the hypothetical air at grid points.
The math included the incompressible Navier-Stokes equations respecting advection, which we were given some pretty baffling approximation formulas for.
Here's an example of Runge's Phenomenon from Numerical Methods, plotted using Newton's divided difference method.

Here's another one with both ends of a string held:
No air particles are simulated; instead, math is used to deduce the speed of the hypothetical air at grid points.
The math included the incompressible Navier-Stokes equations respecting advection, which we were given some pretty baffling approximation formulas for.
Here's an example of Runge's Phenomenon from Numerical Methods, plotted using Newton's divided difference method.
Tuesday, March 8, 2011
Test / First Post!
I'm creating this blog to organize the images, animations, and research papers from my graphics projects into one place, and to show the progress of my graphics related stuff over time.
Each of the concepts that my graphics projects are hitting upon will all eventually be incorporated into one virtual environment / game later on. I am planning on making a super-realistic virtual world for AI inhabitants to physically interact with.
Each of the concepts that my graphics projects are hitting upon will all eventually be incorporated into one virtual environment / game later on. I am planning on making a super-realistic virtual world for AI inhabitants to physically interact with.
Subscribe to:
Posts (Atom)